执行者的博客

云淡风轻


  • 首页

  • 关于

  • 标签

  • 分类

  • 归档

  • 搜索

nginx简介(一)

发表于 2018-11-14 | 分类于 nginx教程 | 阅读次数:
本文字数: 1.6k | 阅读时长 ≈ 1 分钟

版本更新

之前,nginx 默认支持http,如果要转发tcp需要安装第三方模块,在1.9.0之后的版本增加了stream模块用于一般的TCP代理和负载均衡。

The ngx_stream_core_module module is available since version 1.9.0. This module is not built by default, it should be enabled with the --with-stream configuration parameter.
ngx_stream_core_module 。

这个模块在1.90版本后将被启用。但是并不会默认安装,需要在编译时通过指定 –with-stream 参数来激活这个模块。所以,我们如果需要用到这个功能,就需要加上 –with-stream 参数重新编译nginx。对于已在线上运行的nginx,你可能要用到平滑升级来避免线上的服务被中断,可以参考网上教程。

–with-http_ssl_module 模块支持https,默认没有安装,需要对原有的nginx进行平滑升级,同时需要一些其他配置库,对现有的nginx配置可以使用 nginx -V查询

nginx version: nginx/1.10.2
built by clang 8.0.0 (clang-800.0.42.1)
built with OpenSSL 1.1.0c  10 Nov 2016 (running with OpenSSL 1.1.0f  25 May 2017)
TLS SNI support enabled
configure arguments: --prefix=/usr/local/Cellar/nginx/1.10.2_1 --with-http_ssl_module --with-pcre --sbin-path=/usr/local/Cellar/nginx/1.10.2_1/bin/nginx --with-cc-opt='-I/usr/local/opt/pcre/include -I/usr/local/opt/openssl@1.1/include' --with-ld-opt='-L/usr/local/opt/pcre/lib -L/usr/local/opt/openssl@1.1/lib' --conf-path=/usr/local/etc/nginx/nginx.conf --pid-path=/usr/local/var/run/nginx.pid --lock-path=/usr/local/var/run/nginx.lock --http-client-body-temp-path=/usr/local/var/run/nginx/client_body_temp --http-proxy-temp-path=/usr/local/var/run/nginx/proxy_temp --http-fastcgi-temp-path=/usr/local/var/run/nginx/fastcgi_temp --http-uwsgi-temp-path=/usr/local/var/run/nginx/uwsgi_temp --http-scgi-temp-path=/usr/local/var/run/nginx/scgi_temp --http-log-path=/usr/local/var/log/nginx/access.log --error-log-path=/usr/local/var/log/nginx/error.log --with-http_gzip_static_module --with-ipv6
VUE(七):vue使用中的问题

发表于 2018-10-29 | 更新于 2018-11-14 | 分类于 vue | 阅读次数:
本文字数: 292 | 阅读时长 ≈ 1 分钟

常见问题

i-table的render方法this指向window

i-table 中render渲染的方法this指向window

解决办法:定义VUE时使用变量接收

1
let vue=new VUE({})

淘宝镜像

1
ERROR command failed: npm install --loglevel error --registry=https://registry.npm.taobao.org --disturl=https://npm.taobao.org/dist

编辑.vuerc,修改配置”useTaobaoRegistry”: false

1
vi ~/.vuerc

VUE(六):vue-resource HTTP介绍

发表于 2018-10-28 | 更新于 2018-11-14 | 分类于 vue | 阅读次数:
本文字数: 3.3k | 阅读时长 ≈ 3 分钟

HTTP

可以使用全局的 Vue.http 或者在 Vue 实例中的 this.$http 调用 http 服务。

使用
Vue 实例提供了 this.$http 服务可用于发送 HTTP 请求。 A request method call returns a Promise that resolves to the response. Vue 实例在所有回调方法中都会自动绑定到 this 里。

1
2
3
4
5
6
7
8
{
// GET /someUrl
this.$http.get('/someUrl').then((response) => {
// success callback
}, (response) => {
// error callback
});
}

方法
所有的请求类型都可以使用短函数,可以在全局或者 Vue 实例中使用。

// 全局 Vue 对象

1
2
Vue.http.get('/someUrl', [options]).then(successCallback, errorCallback);
Vue.http.post('/someUrl', [body], [options]).then(successCallback, errorCallback);

// Vue 实例

1
2
this.$http.get('/someUrl', [options]).then(successCallback, errorCallback);
this.$http.post('/someUrl', [body], [options]).then(successCallback, errorCallback);

短方法清单:

1
2
3
4
5
6
7
get(url, [options])
head(url, [options])
delete(url, [options])
jsonp(url, [options])
post(url, [body], [options])
put(url, [body], [options])
patch(url, [body], [options])

选项

1
2
3
4
5
6
7
8
9
10
11
12
参数	类型	描述
url string 请求发送到的 URL
body Object, FormData, string 请求中要发送的数据
headers Object 作为 HTTP 请求头发送的 Headers 对象
params Object 作为 URL 参数发送的 Parameters 对象
method string HTTP 方法 (例如: GET, POST, ...)
timeout number 请求超时的毫秒数 (0 为不超时)
before function(request) 在请求发送之前用于修改请求选项的回调函数
progress function(event) 上传时用于控制 ProgressEvent 的回调函数
credentials boolean Indicates whether or not cross-site Access-Control requests should be made using credentials
emulateHTTP boolean 使用 HTTP POST 发送 PUT, PATCH 和 DELETE 请求并设置 X-HTTP-Method-Override 头
emulateJSON boolean 以 application/x-www-form-urlencoded 内容类型发送请求报文

响应
通过下面的属性和函数将请求解析为响应对象:

1
2
3
4
5
6
7
8
9
10
11
属性	类型	描述
url string 响应的源 URL
body Object, Blob, string 响应的数据报文
headers Header 响应头对象
ok boolean 从 200 到 299 的 HTTP 状态码
status number 响应中的 HTTP 状态码
statusText string 响应中的 HTTP 状态文本
函数 类型 描述
text() Promise 作为字符串解析报文
json() Promise 作为 Json 对象解析报文
blob() Promise 作为 Blob 对象解析报文

实例

1
2
3
4
5
6
7
8
9
10
11
12
13
14
15
16
17
18
19
20
{
// POST /someUrl
this.$http.post('/someUrl', {foo: 'bar'}).then((response) => {

// get status
response.status;

// get status text
response.statusText;

// get 'Expires' header
response.headers.get('Expires');

// set data on vm
this.$set('someData', response.body);

}, (response) => {
// error callback
});
}

获取图像并使用 blob() 方法来从响应中提取图像正文内容。

1
2
3
4
5
6
7
8
9
10
11
{
// GET /image.jpg
this.$http.get('/image.jpg').then((response) => {

// resolve to Blob
return response.blob();

}).then(blob) => {
// use image Blob
});
}

拦截器
可以全局定义一个拦截器,用于预处理和后处理的请求。

请求处理

1
2
3
4
5
6
7
8
9
10
11
12
13
14
15
16
17
18
19
20
21
22
Vue.http.interceptors.push((request, next) => {

// modify request
request.method = 'POST';

// continue to next interceptor
next();
});
请求和响应处理
Vue.http.interceptors.push((request, next) => {

// modify request
request.method = 'POST';

// continue to next interceptor
next((response) => {

// modify response
response.body = '...';

});
});

返回一个响应并停止处理

1
2
3
4
5
6
7
8
9
10
Vue.http.interceptors.push((request, next) => {

// modify request ...

// stop and return response
next(request.respondWith(body, {
status: 404,
statusText: 'Not found'
}));
});

VUE(五):vue-cli 3.0使用教程

发表于 2018-10-27 | 更新于 2018-11-14 | 分类于 vue | 阅读次数:
本文字数: 2.8k | 阅读时长 ≈ 3 分钟

webpack

路径别名,@ 等价于 /src 这个目录

1
import Hello from '@/components/Hello'

vue-cli 3.0配置webpack

vue-cli提供的是3.0.0-beta.6版本,简化成使用vue.config.js来配置项目

在根目录新建vue.config.js

1
2
3
4
5
6
7
8
9
10
11
const path = require('path');
function resolve (dir) {
return path.join(__dirname, dir)
}
module.exports = {
lintOnSave: true,
chainWebpack: (config)=>{
config.resolve.alias
.set('@$', resolve('src'))
}
}

1
2
3
4
5
6
7
8
9
10
11
12
13
14
15
16
17
18
19
20
21
22
23
24
25
26
27
28
29
30
31
32
33
34
35
36
37
38
39
40
41
42
43
44
45
46
47
48
49
50
51
52
53
54
55
// vue.config.js 配置说明
//官方vue.config.js 参考文档 https://cli.vuejs.org/zh/config/#css-loaderoptions
// 这里只列一部分,具体配置参考文档
module.exports = {
// 部署生产环境和开发环境下的URL。
// 默认情况下,Vue CLI 会假设你的应用是被部署在一个域名的根路径上
//例如 https://www.my-app.com/。如果应用被部署在一个子路径上,你就需要用这个选项指定这个子路径。例如,如果你的应用被部署在 https://www.my-app.com/my-app/,则设置 baseUrl 为 /my-app/。
baseUrl: process.env.NODE_ENV === "production" ? "./" : "/",

// outputDir: 在npm run build 或 yarn build 时 ,生成文件的目录名称(要和baseUrl的生产环境路径一致)
outputDir: "mycli3",
//用于放置生成的静态资源 (js、css、img、fonts) 的;(项目打包之后,静态资源会放在这个文件夹下)
assetsDir: "assets",
//指定生成的 index.html 的输出路径 (打包之后,改变系统默认的index.html的文件名)
// indexPath: "myIndex.html",
//默认情况下,生成的静态资源在它们的文件名中包含了 hash 以便更好的控制缓存。你可以通过将这个选项设为 false 来关闭文件名哈希。(false的时候就是让原来的文件名不改变)
filenameHashing: false,

// lintOnSave:{ type:Boolean default:true } 问你是否使用eslint
lintOnSave: true,
//如果你想要在生产构建时禁用 eslint-loader,你可以用如下配置
// lintOnSave: process.env.NODE_ENV !== 'production',

//是否使用包含运行时编译器的 Vue 构建版本。设置为 true 后你就可以在 Vue 组件中使用 template 选项了,但是这会让你的应用额外增加 10kb 左右。(默认false)
// runtimeCompiler: false,

/**
* 如果你不需要生产环境的 source map,可以将其设置为 false 以加速生产环境构建。
* 打包之后发现map文件过大,项目文件体积很大,设置为false就可以不输出map文件
* map文件的作用在于:项目打包后,代码都是经过压缩加密的,如果运行时报错,输出的错误信息无法准确得知是哪里的代码报错。
* 有了map就可以像未加密的代码一样,准确的输出是哪一行哪一列有错。
* */
productionSourceMap: false,

// 它支持webPack-dev-server的所有选项
devServer: {
host: "localhost",
port: 1111, // 端口号
https: false, // https:{type:Boolean}
open: true, //配置自动启动浏览器
// proxy: 'http://localhost:4000' // 配置跨域处理,只有一个代理

// 配置多个代理
proxy: {
"/api": {
target: "<url>",
ws: true,
changeOrigin: true
},
"/foo": {
target: "<other_url>"
}
}
}
};

组件封装

import默认会找该目录下index.js的文件,新增一个组件可以创建一个目录name,在里面创建index.js
导入使用如下代码:

1
import './name'

生命周期

钩子:
常用如下:

1
2
3
4
Created:vue实例被生成后的一个生命周期钩子函数。(页面初始化数据加载一般写这里);
beforeCreate:给个loading界面 created撤销loading;
beforeDestory:你确认删除XX吗?
destoryed:当前组件已被删除,清空相关内容

vue组件的声明周期

scss

npm install node-sass –save-dev
npm install sass-loader –save-dev

VUE(四):引入iview

发表于 2018-10-26 | 更新于 2018-11-14 | 分类于 vue | 阅读次数:
本文字数: 2.2k | 阅读时长 ≈ 2 分钟

环境基础

vue-cli 3.x搭建环境

安装

npm安装

NPM安装 iView

1
npm i -S iview

全局引入

一般在 webpack 入口页面 main.js 中如下配置:

1
2
3
4
import iView from 'iview';
import 'iview/dist/styles/iview.css';

Vue.use(iView);

會出現 iView is unidefined,正確的配置
src/iview/index.js

import iview from ‘iview’
前面的 iview 要用小寫

1
2
3
4
5
import Vue from "vue";
import iview from "iview";
import "iview/dist/styles/iview.css";

Vue.use(iview);

src/main.js加入這一行即可

1
import "./iview";

注意:babel.config.js中的plugins配置要删除,否则会引起冲突

按需引入

修改babel.config.js,添加下面配置

1
2
3
4
5
6
7
8
9
"plugins": [
[
"import",
{
"libraryName": "iview",
"libraryDirectory": "src/components"
}
]
]

如果您想在 webpack 中按需使用组件,减少文件体积,可以这样写:

1
2
3
import { Button, Table } from 'iview';
Vue.component('Button', Button);
Vue.component('Table', Table);

提醒:*按需引用仍然需要导入样式,即在 main.js
或根组件执行 import ‘iview/dist/styles/iview.css’;*

注意:尽量使用index.js中的命名,避免使用vue内置的名字,否则会引起错误

vue-ui安装

自定义配置:

此时很多朋友会问了,没有配置文件,那我需要自定义一个配置咋办呢?
莫慌,此时我们只需要在项目根目录新建一个 vue.config.js 文件就能使用自定义配置了

1
2
3
4
5
6
7
8
module.exports = {
baseUrl: process.env.NODE_ENV === 'production'
? '/production-sub-path/'
: '/',
devServer: {
port: 8000
}
}

组件使用规范

1
2
3
4
5
6
7
8
9
10
11
12
13
14
15
16
a、动态传值,使用 :prop = ''
b、在非 template/render 模式下(例如使用 CDN 引用时),
组件名要分隔(驼峰命名改为烤肉串),例如 DatePicker 必须要写成 date-picker
c、以下组件,在非 template/render 模式下,需要加前缀 i-:
·Button: i-button
·Col: i-col
·Table: i-table
·Input: i-input
·Form: i-form
·Menu: i-menu
·Select: i-select
·Option: i-option
·Progress: i-progress
以下组件,在所有模式下,必须加前缀 i-,除非使用 iview-loader:
·Switch: i-switch
·Circle: i-circle

问题

使用箭头函数this为空,箭头函数会改变this指向

Try changing the iView import statement to the following:

import iView from ‘iview/dist/iview.min’;
Frequently you’ll find that distribution packages contain the production version of the library located within a dist directory. Seeing as the stylesheet is located there, I’d assume the js is there as well.

// likely that the iview js in this directory
import ‘iview/dist/styles/iview.css’;

VUE(三):安装vue-cli 3.x

发表于 2018-10-25 | 更新于 2018-11-14 | 分类于 vue | 阅读次数:
本文字数: 4.3k | 阅读时长 ≈ 4 分钟

安装

安装vue-cli

1
npm install --g @vue/cli

创建模板项目

1
vue create 【项目名称】

项目结构

通过cli 3.x 新建的项目的结构较之前简单,只有 public 和 src 两个文件夹

安装依赖

1
npm install

配置启动脚本(packge.json > script)

1
2
3
4
5
6
7
8
"scripts": {
"dev": "vue-cli-service serve --open",
"build": "vue-cli-service build",
"lint": "vue-cli-service lint",
"test:unit": "vue-cli-service test:unit",
"test:e2e": "vue-cli-service test:e2e"
},
# 可参考文档 https://cli.vuejs.org/guide/cli-service.html

执行脚本

1
2
# 选择执行dev环境脚本
npm run serve

调整webpack配置

在根目录下新建文件vue.config.js
文档参考 https://cli.vuejs.org/guide/webpack.html
在根目录下新建.env .env.development .env.production文件,并修改启动脚本,实现加载不同环境下配置

vue.config.js参考配置

1
2
3
4
5
6
7
8
9
10
11
12
13
14
15
16
17
18
19
20
21
22
23
24
25
26
27
28
29
30
31
32
const path = require('path')
const resolve = dir => {
return path.join(__dirname, dir)
}
const BASE_URL = process.env.BASE_URL
// 参见:https://cli.vuejs.org/guide/webpack.html
module.exports = {
baseUrl: BASE_URL, // 根域上下文目录
outputDir: 'dist', // 构建输出目录
// assetsDir: 'assets', // 静态资源目录 (js, css, img, fonts)
// pages: vueConf.pages,
lintOnSave: true, // 是否开启eslint保存检测,有效值:ture | false | 'error'
runtimeCompiler: true, // 运行时版本是否需要编译
transpileDependencies: [], // 默认babel-loader忽略mode_modules,这里可增加例外的依赖包名
productionSourceMap: false, // 是否在构建生产包时生成 sourceMap 文件,false将提高构建速度
//加载器
chainWebpack: config => {
config.resolve.alias
.set('@', resolve('src'))
.set('_c', resolve('src/components'))
},
devServer: {
open: true,
host: 'localhost',
port: 8080,
https: false,
hotOnly: false,
//代理
proxy: null,
before: app => {}
}
}

添加其他组件

1
2
3
4
5
6
7
# 如安装包 @vue/cli-plugin-eslint
vue add @vue/eslint
# 如安装包 @foo/vue-cli-plugin-bar
vue add @foo/bar
#安装vuex 和 vue-router是例外
vue add router
vue add vuex

常用组件

1
2
3
4
5
6
7
8
9
10
11
12
13
14
15
16
17
18
19
20
21
22
23
24
25
26
27
28
29
可发布生产(dependencies):
vue // 包含vue-loader(必要组件)
vue-router // vue 路由 (重要组件)
vuex // 全局响应式状态仓库 (重要组件)
axios // vue http请求 (重要组件)
iview // iView UI框架
iview-area // 基于Iview的城市级联组件
clipboard // 轻量级的实现复制文本到剪贴板功能的JavaScript插件
codemirror // 文本编辑器插件
countup // 数字数据的动画
cropperjs //图像裁剪器。
echarts // 图表
html2canvas //浏览器截图插件
js-cookie // 轻量级的JavaScript API,用于处理cookie
simplemde // Markdown编辑器
sortablejs // 重新排序的拖放列表的JavaScript库。
vue-i18n // vue国际化
wangeditor // 轻量级web富文本编辑器
仅在开发环境(devDependencies):
vue-template-compiler // vue-template组件(必要组件),版本必须与vue保持一致
@vue/cli-plugin-babel // ES标准转换组件(必要组建)
@vue/cli-service // cli-service服务,如运行 构建 测试(必要组件)
less less-loader // less-loader(必要组件),将less编译为css,将css文件当做模块来处理 style标签里加上lang=”less”里面就可以写less的代码了style标签里加上scoped表示只在此作用域有效
@vue/cli-plugin-eslint @vue/eslint-config-standard // 语法检查
eslint-plugin-cypress lint-staged // 用于测试环境的语法检查插件
@vue/cli-plugin-unit-mocha // 使用mocha-webpack + chai运行单元测试。
@vue/test-utils // Vue.js的官方测试库。它提供了单元测试Vue组件的方法。
chai // Chai是节点和浏览器的BDD / TDD断言库,可以与任何javascript测试框架配对。
mockjs //模拟数据生成器,帮助前端开发和原型与后端进程分离,并在编写自动化测试时特别减少一些单调性。

执行脚本

1
2
3
4
# 不是'@vue/cli-plugin-'开头的组件用以下安装方式
npm install -save -dev @vue/eslint-config-standard vuex iview echarts mockjs
# 是'@vue/cli-plugin-【name】'开头的组件可以以下方式安装
vue add name

安装vue-ui

1
2
3
4
5
Install:

npm install -g @vue/cli
# OR
yarn global add @vue/cli

Create a project:

1
2
3
vue create my-project
# OR
vue ui

安装过程

1
2
3
4
5
6
7
Vue CLI v3.0.5
? Please pick a preset: Manually select features
? Check the features needed for your project: Babel, Router, Vuex, CSS Pre-processors
? Use history mode for router? (Requires proper server setup for index fallback in production) Yes
? Pick a CSS pre-processor (PostCSS, Autoprefixer and CSS Modules are supported by default): Less
? Where do you prefer placing config for Babel, PostCSS, ESLint, etc.? In dedicated config files
? Save this as a preset for future projects? (y/N) y

启动

1
2
3
yarn serve 
// OR
npm run serve

启动UI

1
vue ui

卸载重装

1
2
3
4
5
6
$ sudo npm uninstall -g vue
$ sudo npm uninstall -g vue-cli
$ sudo npm uninstall -g @vue/cli
$ sudo npm cache clean --force
$ sudo npm install -g vue
$ sudo npm install -g @vue/cli

VUE(二):安装vue-cli

发表于 2018-10-24 | 更新于 2018-11-14 | 分类于 vue | 阅读次数:
本文字数: 2.4k | 阅读时长 ≈ 2 分钟

安装vue-cli

假设你的机子上已经有了最新的node和npm了,那我们就只需要执行以下命令:

1
$ npm install -g vue-cli

构建完了之后,随便进入一个我们事先准备好的目录,比如demo目录,然后在目录中做初始化操作:

1
2
3
4
# vue init 是vue初始化项目
# webpack 是打包工具,其中也可以使用Browserify,感兴趣可以自行研究
# project 是自定义的项目名称
$ vue init webpack myProject

webpack参数是指myProject这个项目将会在开发和完成阶段帮你自动打包代码,比如将js文件统一合成一个文件,将CSS文件统一合并压缩等。

安装中的提示信息,可以修改和选择

1
2
3
4
5
6
7
8
9
10

? Project name vueproject ---------------------项目名称
? Project description A Vue.js project---------------------项目描述
? Author wondershoter <starlord.yan@gmail.com>---------------------作者
? Vue build standalone
? Install vue-router? Yes---------------------是否安装Vue路由,推荐安装,是页面跳转用的
? Use ESLint to lint your code? Yes---------------------是否启用eslint检测规则
? Set up unit tests no---------------------是否安装单元测试,选择否,不然安装依赖会卡住
? Setup e2e tests with Nightwatch? Yes---------------------是否安装e2e测试
? Should we run `npm install` for you after the project has been created? (recommended) npm

按照提示信息启动

1
2
3
4
5
6
7
8
# 进入工程目录
cd myProject
# 安装依赖,如果要具体安装其他模块可以单独使用,执行之后,目录里多了一个node_modules文件夹,这里放的就是所有依赖的模块
npm install #如果安装过程已经执行,略过;
# 运行项目
npm run dev
# 打包工作,用于正式环境
npm run build

npm run dev 是开始执行我们的项目了,一旦执行这个命令之后,等一小会,浏览器应该会自动帮你打开一个tab为http://localhost:8080/#/的链接,这个链接就是我们本地开发的项目主页

修改端口

1
2
3
4
5
```


## 文件目录分析
package.json保存一些依赖信息,config保存一些项目初始化配置,build里面保存一些webpack的初始化配置,index.html是我们的首页,除了这些,最关键的代码都在src目录中,index在很多服务器语言中都是预设为首页,像index.htm,index.php等

build ——————-项目构建相关代码(webpack配置)
build.js ————-生产环境构建代码
check-versions.js ———-检查node、npm等版本
utils.js ————————构建工具相关
vue-loader.conf.js ———css加载器的配置
webpack.base.conf.js —webpack的基础配置信息
webpack.dev.conf.js —–webpack开发环境配置信息,构建开发本地服务器
webpack.prod.conf.js —wenpack生产环境配置信息
config ——————-配置目录,包括端口号,打包输出等的vue基本配置文件
dev.env.js ———–开发环境变量
prod.env.js ———–生产环境变量
index.js ————-项目的配置变量,端口号等
node_modules ———–加载的项目依赖模块
static ——————-静态资源目录
index.html —————首页的入口文件,可以添加meta等参数
README.md —————项目的说明文档,makedown格式
src ———————–源码目录,主要的开发
assets —————静态资源,css,image等可以存放
components ———–公共组件
router —————路由文件夹,配置页面跳转
views —————-页面编写的地方,(可以自行定义命名)
main.js ——————入口文件,全局的配置和加载
.babelrc —————–ES6语法编译配置,用来将es6代码转换成浏览器可识别的es5代码
.gitignore —————git上传需要忽略的文件的格式
package.json ————-项目的基本信息,包括开发所需要的模块、项目名称、版本号等
.postcssrc.js ————转换css的工具
.editorconfig ————定义代码格式
`

入口js文件在src目录中的main.js

说明

Babel,转译成浏览器可识别的语言,可以让你的项目支持更新的语法,如es6\es7等
PWA,模拟原生app,渐进式网络应用程序

Hexo(九):Hexo+Github+TravisCI部署到Github与自己的服务器

发表于 2018-10-23 | 更新于 2018-11-14 | 分类于 hexo | 阅读次数:
本文字数: 2.1k | 阅读时长 ≈ 2 分钟

自动部署

使用hexo在github上搭blog最大的问题就是,每次提交都需要先hexo -g,然后再deploy生成的文件们,这样哪怕是改一个小的地方都需要重新编译全部blog,因此使用Travis来自动持续集成提交到github以后的操作,具体逻辑:

  • 写完blog后,直接push到github的source分支,其它的就可以不用管了
  • 由于我的.travis.yml配置文件里设置监听的就是source分支,所以会触发webhook
  • Travis则会将该项目clone过去,然后按照.travis.yml的设置执行接下来的命令
  • 执行完成后,再将编译好的文件们发送到自己的服务器,顺便push回master分支上来
  • 这样就可以在blog.godi13.com和Godi13.github.io上都访问blog了

Github

为了使travis能够将编译好的文件们push回github,我们需要生成token,步骤如下:
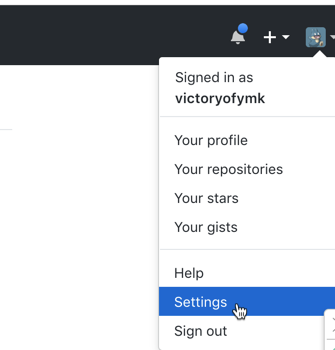
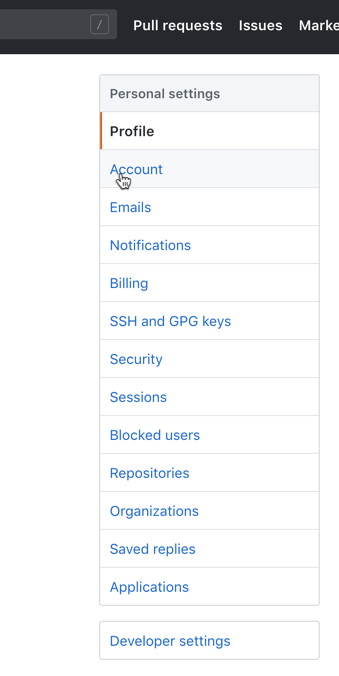
1) 点击github右上方头像,然后点setting,或者https://github.com/settings/profile

2) 点击Developer settings

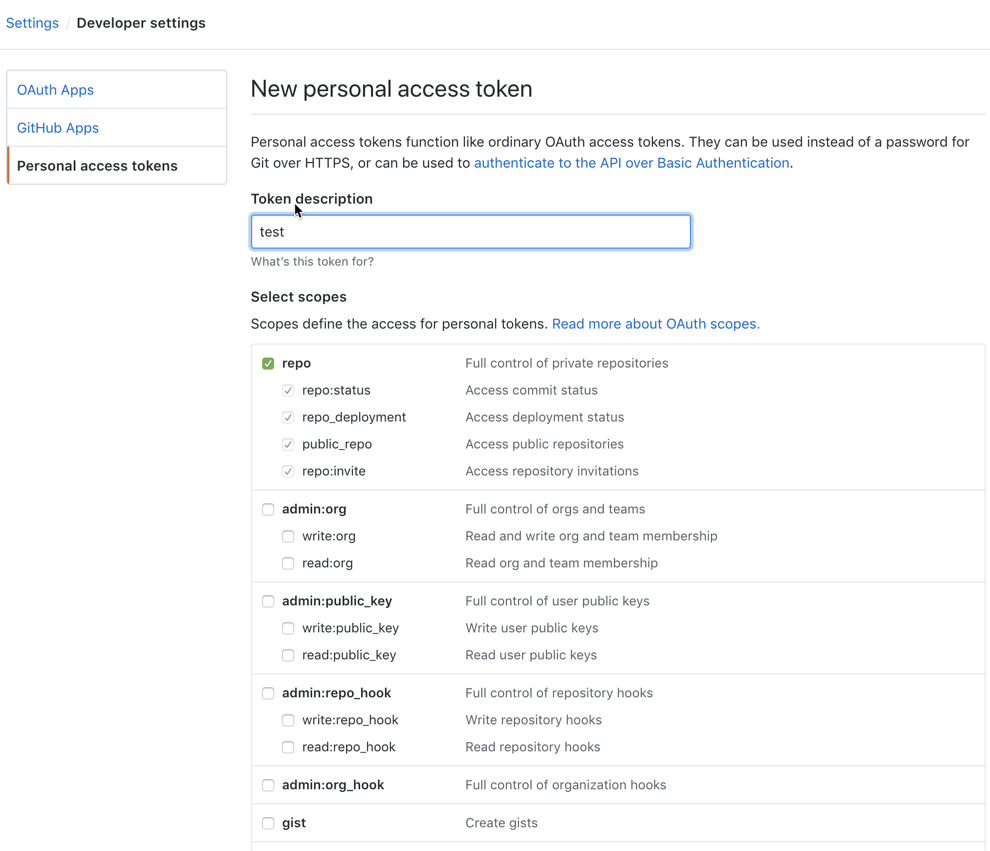
3) 进入Personal access tokens,点击Generate new token,为token起一个名字,勾选repo,然后点击生成,生成token以后,一定要复制好,因为只显示一次,如果丢失只能再次生成

Travis

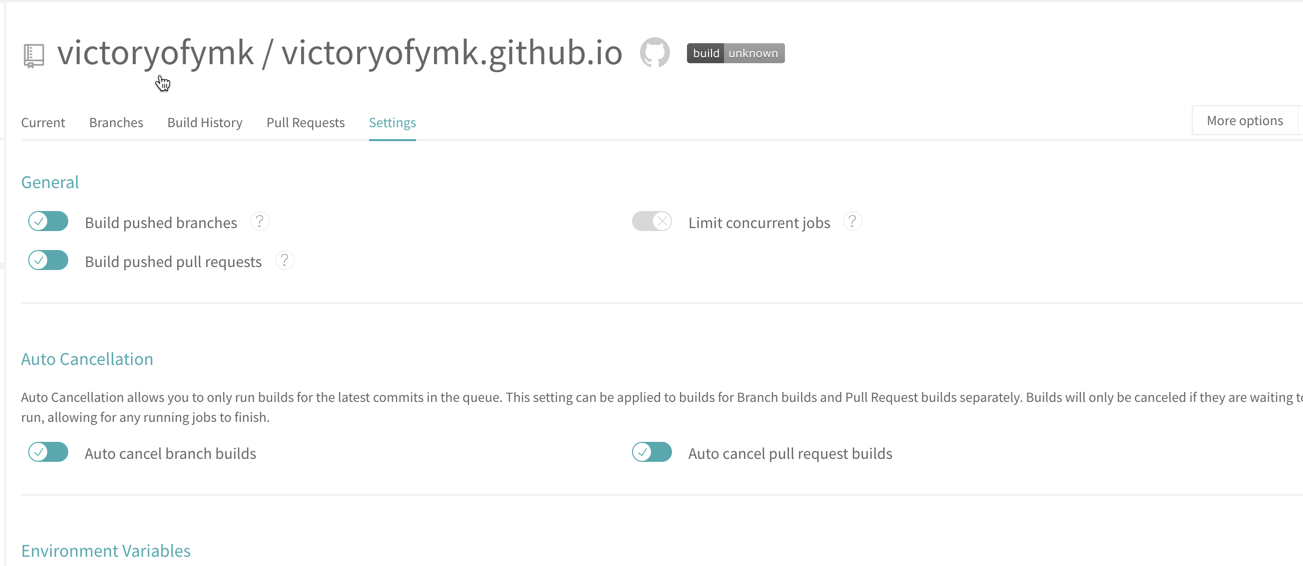
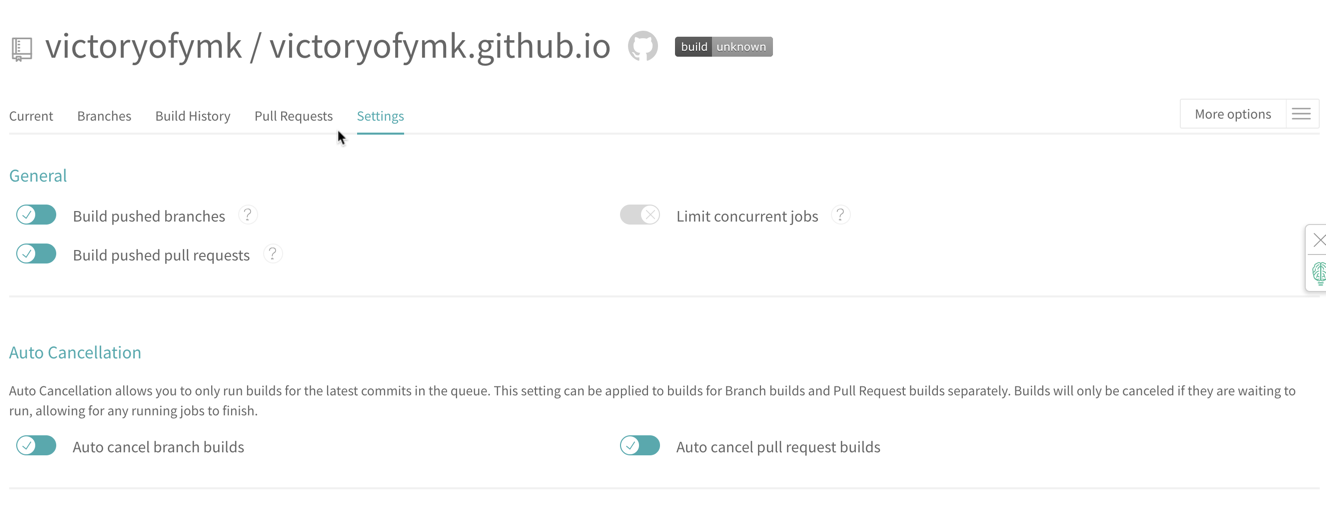
1) 使用github帐号登录Travis,右上方按钮点击同步项目,下方打开需要集成的项目,最后点击齿轮进入项目配置页面

2) 勾选相应配置,然后往下移动页面到环境变量

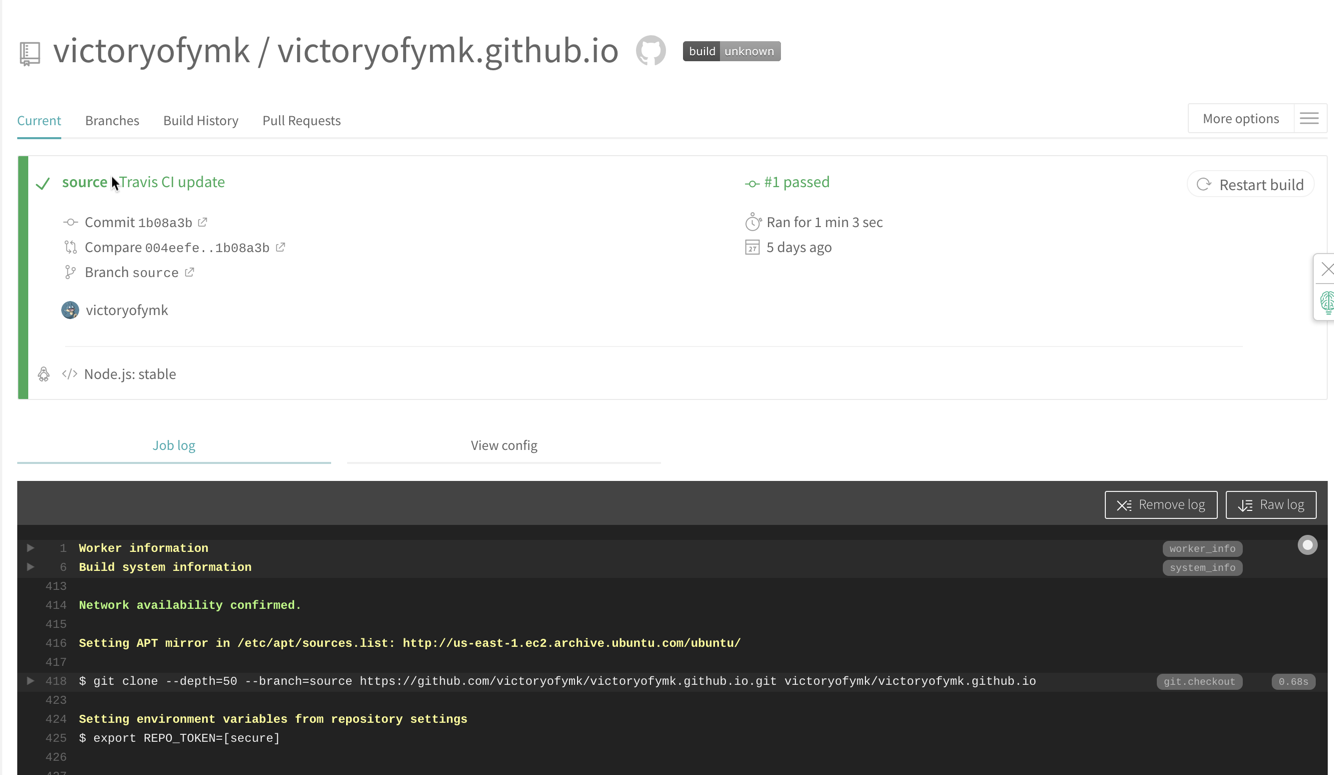
3) 在这里我将变量名称名为REPO_TOKEN,放上token,点击Add按钮

Terminal

回到终端,进入blog所在的文件夹下,新建.travis.yml文件,并添加以下内容

1
2
3
4
5
6
7
8
9
10
11
12
13
14
15
16
17
18
19
20
21
22
23
24
25
26
27
28
29
30
31
32
33
34
35
36
# 使用语言
language: node_js
# node版本
node_js: stable
# 设置只监听哪个分支
branches:
only:
- source
# 缓存,可以节省集成的时间,这里我用了yarn,如果不用可以删除
cache:
apt: true
yarn: true
directories:
- node_modules
# tarvis生命周期执行顺序详见官网文档
before_install:
- git config --global user.name "Godi13"
- git config --global user.email "mqzq9388@gmail.com"
# 由于使用了yarn,所以需要下载,如不用yarn这两行可以删除
- curl -o- -L https://yarnpkg.com/install.sh | bash
- export PATH=$HOME/.yarn/bin:$PATH
- npm install -g hexo-cli
install:
# 不用yarn的话这里改成 npm i 即可
- yarn
script:
- hexo clean
- hexo generate
after_success:
- cd ./public
- git init
- git add --all .
- git commit -m "Travis CI Auto Builder"
# 这里的 REPO_TOKEN 即之前在 travis 项目的环境变量里添加的
- git push --quiet --force https://$REPO_TOKEN@github.com/Godi13/Godi13.github.io.git
master

然后,准备push该项目到github,看下是否成功,如果是新项目可参照下面的git指令

1
2
3
4
5
6
7
8
git init
# 添加自己的项目
git remote add origin git@github.com:Godi13/Godi13.github.io.git
# 新建并切换分支
git checkout --orphan source
git add -A
git commit -m "Travis CI"
git push

关于 –orphan 请参考如何建立一個沒有 Parent 的獨立 Git branch

如最终成功则会看到

服务器

未完…

参考资料
使用 Travis 自动部署 Hexo 到 Github 与 自己的服务器
Hexo作者的.travis.yml配置
用 Travis CI 自動部署網站到 GitHub
一点都不高大上,手把手教你使用Travis CI实现持续部署
使用 Travis CI 自动更新 GitHub Pages
使用Travis CI自动构建hexo博客

Hexo(六):绑定个人域名

发表于 2018-10-23 | 更新于 2018-11-14 | 分类于 hexo | 阅读次数:
本文字数: 683 | 阅读时长 ≈ 1 分钟

绑定个人域名

现在使用的域名是Github提供的二级域名,也可以绑定为自己的个性域名。购买域名,可以到GoDaddy官网,,也可以到阿里万网购买。

1.Github端

在/blog/themes/landscape/source目录下新建文件名为:CNAME文件,注意没有后缀名!直接将自己的域名如:victoryofymk.com写入。

终端cd到blog目录下执行如下命令重新部署:

1
2
3
4
5
6

$ hexo clean

$ hexo g

$ hexo d

注意:网上许多都是说在Github上直接新建CNAME文件,如果这样的话,在你下一次执行hexo d部署命令后CNAME文件就消失了,因为本地没有此文件。

2.域名解析

如果将域名指向一个域名,实现与被指向域名相同的访问效果,需要增加CNAME记录。登录万网,在你购买的域名后边点击:解析 –> 添加解析

1
2
3
4
记录类型:CNAME
主机记录:将域名解析为[example.com](https://link.jianshu.com/?t=http%253A%252F%252Fexample.com)(不带www),填写@或者不填写
记录值:victoryofymk.github.io. (victoryofymk改为你自己的用户名),点击保存即可
域名解析

此时,点击访问http://victoryofymk.com和访问http://victoryofymk.github.io效果一致,大功告成!

参考的文章:
1.http://gonghonglou.com/2016/02/03/firstblog/

Hexo(七):第三方服务

发表于 2018-10-23 | 更新于 2018-11-14 | 分类于 hexo | 阅读次数:
本文字数: 6.1k | 阅读时长 ≈ 6 分钟

评论系统

为hexo增加评论功能

添加disqus评论

使用该评论功能需要“科学上网”。

1.注册disqus账号https://disqus.com

2.在disqus设置页面中点 Add Disqus to your site 添加你的网站地址(即为https://yourname.github.io), 和设置Choose your unique Disqus URL, 你所填写的unique Disqus URL即为hexo配置文件中需要修改的short_name字段。

3.评论预审核可以不填写
4.第一次需要验证邮箱
5.打开hexo/themes/next/_config.yml主题配置文件,修改下面字段:

1
2
3
4
5
#Disqus
disqus:
enable: true
shortname: #shortname即为你上面填写的唯一disqus路径,填上就好
count: true

添加Hypercomments

来自俄罗斯,提供付费和免费的服务

添加Valine

基于LeanCloud,也支持阅读量等,免费版有一定限制首先API请求每天30000,存储10G

修改next主题配置文件

1
2
3
4
5
6
7
8
9
10
11
12
13
14
# Valine.
# You can get your appid and appkey from https://leancloud.cn
# more info please open https://valine.js.org
valine:
enable: false # When enable is set to be true, leancloud_visitors is recommended to be closed for the re-initialization problem within different leancloud adk version.
appid: # your leancloud application appid
appkey: # your leancloud application appkey
notify: false # mail notifier , https://github.com/xCss/Valine/wiki
verify: false # Verification code
placeholder: Just go go # comment box placeholder
avatar: mm # gravatar style
guest_info: nick,mail,link # custom comment header
pageSize: 10 # pagination size
visitor: false # leancloud-counter-security is not supported for now. When visitor is set to be true, appid and appkey are recommended to be the same as leancloud_visitors' for counter compatibility. Article reading statistic https://valine.js.org/visitor.html

appid,appkey 填写leancloud的应用注册后提供的即可,参考另一篇博客或者站内搜索

添加Gitment

基于github的issue实现的,不再维护

添加Gitalk

基于github的issue实现的,有人维护

登陆GitHub,然后点击头像,然后Settings,Developer settings,然后,点击OAuth Apps,New OAuth App创建

1
2
3
4
5
参数说明:
Application name: # 应用名称,随意
Homepage URL: # 网站URL,如https://asdfv1929.github.io
Application description # 描述,随意
Authorization callback URL:# 网站URL,https://asdfv1929.github.io

创建完成后client id和client secret在配置文件中需要使用

修改next主题配置,新增

1
2
3
4
5
6
7
8
9
10
11
12
# Gitalk评论
gitalk:
enable: true
owner: #这个项目名的拥有者(GitHub账号或组织)
repo: #你要存放的项目名
admin: #这个项目名的拥有者(GitHub账号或组织)
labels: gitalk #GitHub issues的标签,下面会详细说
clientID: #client id
clientSecret: #client secret
gitalk_css: //cdn.jsdelivr.net/npm/gitalk@1/dist/gitalk.css
gitalk_js: //cdn.jsdelivr.net/npm/gitalk@1/dist/gitalk.min.js #
md5: //cdn.bootcss.com/blueimp-md5/1.1.0/js/md5.min.js

gitalk.swig如果已经配置css和js可以省略,md5加密ID可以解决gitbub对Issue label长度最多50的限制。

另外可以参考next对于gitment等其他评论插件的集成。

配置主题方法一

找到NexT的主题目录,然后进入这个路径/next/layout/_custom/下,应该有head.swig,header.swig,sidebar.swig这三个文件。
这三个文件应该就是自定义布局的位置。然后,在sidebar.swig里面添加如下代码:

1
2
3
4
5
6
7
8
9
10
11
12
13
14
15
16
17
18
19
20
21
22
23
24
25
{% if page.comments and config.gitalk.enable %}
<link rel="stylesheet" href="{{ config.gitalk.gitalk_css }}">
<script src="{{ config.gitalk.gitalk_js }}"></script>
<script src="{{ config.gitalk.md5 }}"></script>
<script>
var gitalk = new Gitalk({
clientID: '{{ config.gitalk.clientID }}',
clientSecret: '{{ config.gitalk.clientSecret }}',
repo: '{{ config.gitalk.repo }}',
owner: '{{ config.gitalk.owner }}',
admin: '{{ config.gitalk.admin }}',
id: md5(location.pathname),
distractionFreeMode: 'true'
});
var div = document.createElement('div');
div.setAttribute("id", "gitalk_comments");
div.setAttribute("class", "post-nav");
var bro = document.getElementById('posts').getElementsByTagName('article');
bro = bro[0].getElementsByClassName('post-block');
bro = bro[0].getElementsByTagName('footer');
bro = bro[0];
bro.appendChild(div);
gitalk.render('gitalk_comments');
</script>
{% endif %}

参考:https://yunhao.space/2018/07/04/hexo-next-gitalk-comments-tutor/

配置主题方法二

以NexT主题做示范,毕竟其他的也是大同小异。
在主题的\layout_third-party\comments目录中,新建一个gitalk.swig文件,文件内容如下:

1
2
3
4
5
6
7
8
9
10
11
12
13
14
15
16
17
{% if page.comments && theme.gitalk.enable %}
<link rel="stylesheet" href="https://unpkg.com/gitalk/dist/gitalk.css">
<script src="https://unpkg.com/gitalk/dist/gitalk.min.js"></script>
<script src="{{ theme.gitalk.md5 }}"></script>
<script type="text/javascript">
var gitalk = new Gitalk({
clientID: '{{ theme.gitalk.ClientID }}',
clientSecret: '{{ theme.gitalk.ClientSecret }}',
repo: '{{ theme.gitalk.repo }}',
owner: '{{ theme.gitalk.owner }}',
admin: ['{{ theme.gitalk.admin }}'],
id: md5(location.pathname),
distractionFreeMode: '{{ theme.gitalk.distractionFreeMode }}'
})
gitalk.render('gitalk-container')
</script>
{% endif %}

还是,在主题的\layout_third-party\comments目录中,找到一个index.swig的文件,打开,添加这一行代码:

1
{% include 'gitalk.swig' %}

接着,在主题的\layout_partials目录中,找到comments.swig文件,打开,找到

1
2
3
4
5
{% elseif theme.valine.appid and theme.valine.appkey %}
<div class="comments" id="comments">
</div>

{% endif %}

在空了一行的地方加上以下代码:

1
2
{% elseif theme.gitalk.enable %}
<div id="gitalk-container"></div>

新建/source/css/_common/components/third-party/gitalk.styl文件,添加内容:

1
2
3
4
.gt-header a, .gt-comments a, .gt-popup a
border-bottom: none;
.gt-container .gt-popup .gt-action.is--active:before
top: 0.7em;

修改/source/css/_common/components/third-party/third-party.styl,在最后一行上添加内容,引入样式:

1
@import "gitalk";

添加百度分享功能

百度分享功能的添加可以参考下面这篇博客。Hexo+Github搭建个人博客(三)——百度分享集成

百度统计访客访问量功能

其他酷炫小功能参考hexo的next主题个性化教程:打造炫酷网站。

123
执行者

执行者

活出自我

22 日志
4 分类
8 标签
RSS
GitHub E-Mail
© 2018 执行者 | 88k
由 Hexo 强力驱动 v3.8.0
|
主题 – NexT.Muse v6.4.2